Integrate with gitlab-ci
GitLab is a platform where you can create and build applications. You can use your own instance or an existing one.
In the following guide, you will update a GitLab project with its own OpenTestFactory workflow that will run whenever you push changes in your project.
You need to have access to a project on a GitLab instance, and you need to be able to start a GitLab pipeline on that project.
You also need to have access to a deployed OpenTestFactory orchestrator instance, with a corresponding token, that is accessible from the GitLab instance.
You will use the opentf-ctl tool.
Preparation
You need to define two environment variables. You can do this at your group level or at your project’s level.
If you define them at the group level, all your projects in the group will be able to use them. That can be quite handy if you use many projects. If you define them at the project level, only this project will see them. If you define a variable at the group and the project level, the definition at project level wins.
One variable, OPENTF_CONFIG, is typically shared. It references your OpenTestFactory
orchestrator instance.
Depending on your preferences and security requirements, you can share the other variable,
OPENTF_TOKEN, between your projects or define one per project.
Information
If you do not want to give those variables those names, you can freely change them,
but then you will have to specify them explicitly in your GitLab pipeline, using the
--opentfconfig= and --token=command line options below.
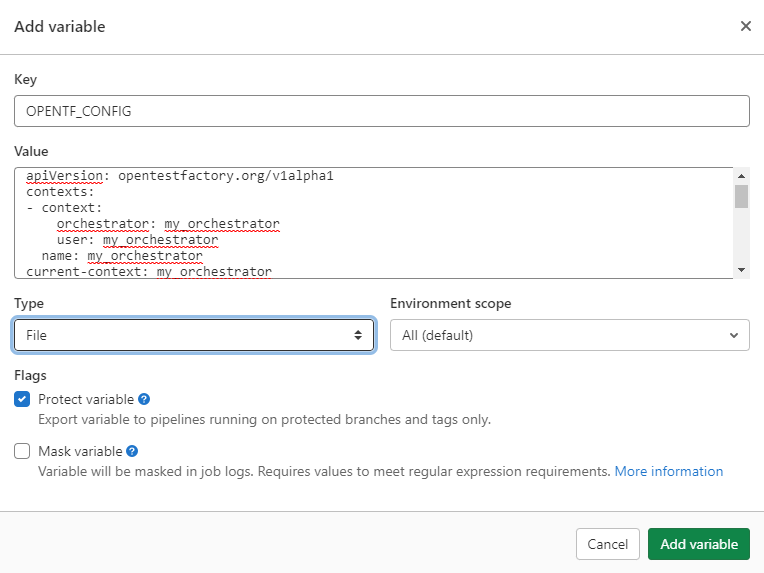
OPENTF_CONFIG
The OPENTF_CONFIG variable should contain your orchestrator configuration file, that
is, the information needed to reach your orchestrator instance.
Local Deployment
If you are using a local deployment, on your workstation, as described in Docker compose deployment, it will probably look something like the following:
apiVersion: opentestfactory.org/v1alpha1
contexts:
- context:
    orchestrator: my_orchestrator
    user: me
  name: my_orchestrator
current-context: my_orchestrator
kind: CtlConfig
orchestrators:
- name: my_orchestrator
  orchestrator:
    insecure-skip-tls-verify: false
    services:
      receptionist:
        port: 7774
      agentchannel:
        port: 24368
      eventbus:
        port: 38368
      localstore:
        port: 34537
      insightcollector:
        port: 7796
      killswitch:
        port: 7776
      observer:
        port: 7775
      qualitygate:
        port: 12312
    server: http://127.0.0.1
users:
- name: me
  user:
    token: aa
Non-local Deployment
If you are using a non-local deployment, on your intranet or open to the internet, as described in Kubernetes deployment, it will probably look something like the following.
(In the example below, the HTTP protocol is used. If your deployment is using the HTTPS protocol, which is strongly recommended, replace the port values with 443.)
apiVersion: opentestfactory.org/v1alpha1
contexts:
- context:
    orchestrator: my_orchestrator
    user: me
  name: my_orchestrator
current-context: my_orchestrator
kind: CtlConfig
orchestrators:
- name: my_orchestrator
  orchestrator:
    insecure-skip-tls-verify: false
    services:
      receptionist:
        port: 80
      agentchannel:
        port: 80
      eventbus:
        port: 80
      localstore:
        port: 80
      insightcollector:
        port: 80
      killswitch:
        port: 80
      observer:
        port: 80
      qualitygate:
        port: 80
    server: http://example.com
users:
- name: me
  user:
    token: aa
Testing your Configuration File
If you have not tested your configuration file before, it is a good idea to test it now.
On your workstation, install the opentf-tools package, using the following command:
pip install --upgrade opentf-tools
Tip
The above command will install the most recent version of the package. If you want to install a specific version you can use the following command:
pip install opentf-tools==0.42.0
The list of available versions is on PyPI.
Then, copy your configuration in a config file in your current directory, and use the
following command:
opentf-ctl get workflows --opentfconfig=config --token=YOURTOKEN
You should get something like:
WORKFLOWID
6c223f7b-3f79-4c51-b200-68eaa33c1325
31b5e665-819c-4e92-862a-f05d1993c096
Please refer to “Tools configuration” for more information on making your configuration file if needed.
Defining the Variable
Go to your project (or group) Settings/CI/CD panel and search for the Variables section.
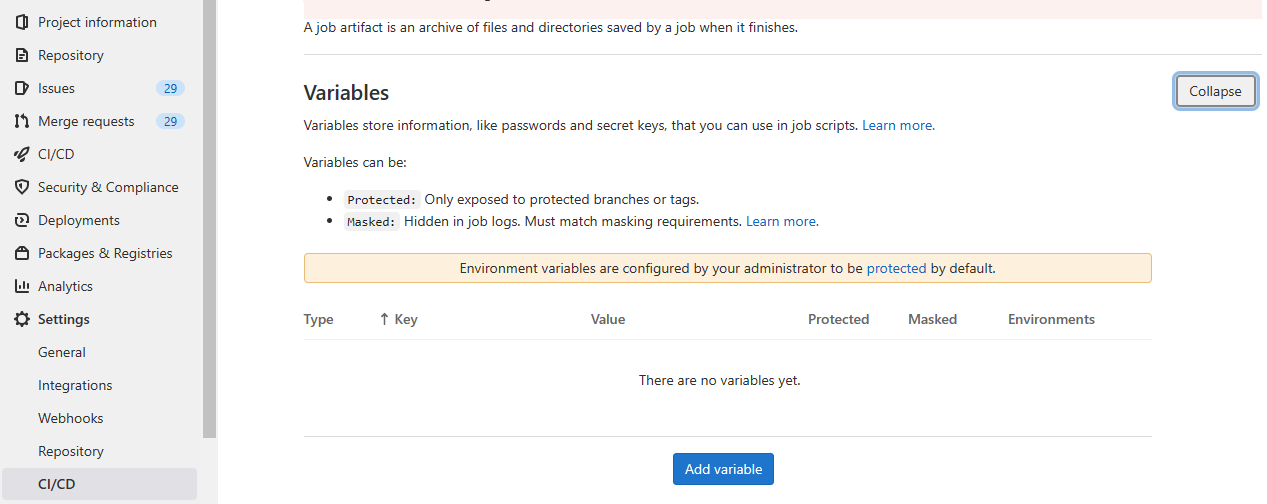
In this section, add a new variable OPENTF_CONFIG with the value above. It should
be of type File.
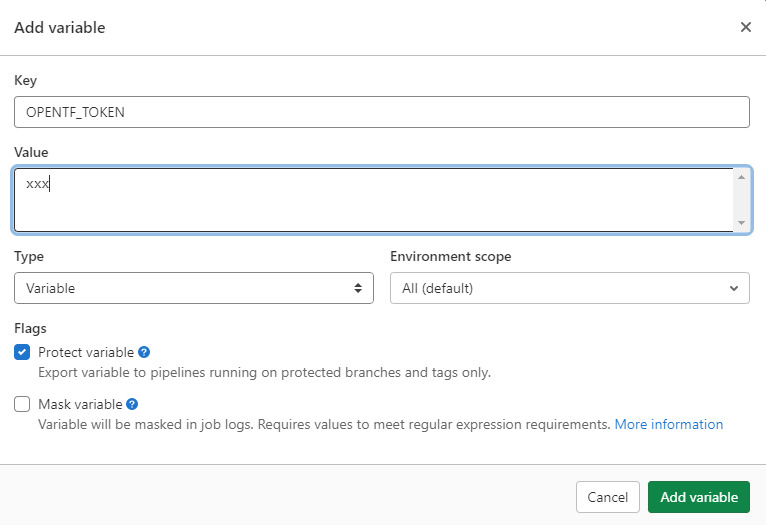
OPENTF_TOKEN
The OPENTF_TOKEN variable should contain the token you want to use to communicate
with the orchestrator.
Defining the Variable
Add a new variable OPENTF_TOKEN with the value of your token. It should be of type
Variable.
The two environment variables, OPENTF_CONFIG and OPENTF_TOKEN, will be available for use
in your pipeline jobs.
Security
In the screenshots above, the variables have been flagged as “Protected variables”. It means they will only be usable from protected branches and tags, which is a good practice: you do not expose your token to everybody with access to your project, and you prevent possible undesired code execution in your execution environments.
Integration
Now that your two environment variables are defined, you are ready to integrate your OpenTestFactory orchestrator within your GitLab CI/CD.
This section assumes a basic knowledge of GitLab CI/CD. See “Getting started with GitLab CI/CD” for more information.
Note
There is no required location for your project’s workflows, but it is a good
practice to put them in a single location. .opentf/workflows is a good candidate.
Running a Workflow
If you have a .opentf/workflows/workflow.yaml orchestrator workflow in your project, you
can use the following .gitlab-ci.yml file to run it each time you make changes to your
project.
# A very simple pipeline with a single "test" stage made of a single workflow "job"

default:
  image: python:3.8

stages:            # List of stages for jobs, and their order of execution
  - test

opentf-workflow:   # This job runs in the build stage, which runs first.
  stage: test
  script:
    - pip install --upgrade opentf-tools
    - opentf-ctl run workflow .opentf/workflows/workflow.yaml --wait
The pip install ... part ensures that the most recent version of opentf-ctl is
available on the runner, and the opentf-ctl run ... part runs the workflow.
--wait option in the run command ensures that the pipeline terminates when the
workflow is completed.
Sharing Files and Variables
Sometimes, you need to share information—variables or files—for your workflow to work.
For variables, you can do it through the variables statement in your .gitlab-ci.yml
file, prefixing them with OPENTF_RUN_, or pass them using the -e command line
option (without the OPENTF_RUN_ prefix).
For files, you pass them using the -f my_file=my_file_path command line option.
You can use those options more than once. For variables, if a variable is defined both
in the variables section and using the -e command line option, the command line option
definition wins. (And if you have multiple definitions of a given variable using the -e
command line options, the last definition wins.)
The following example will run a .opentf/workflows/my_workflow_2.yaml workflow, providing
it with a file file (which content will be the one of my_data/file.xml) and two
environment variables: FOO and OPENTF_RUN_TARGET.
default:
  image: python:3.8

stages:            # List of stages for jobs, and their order of execution
  - test

opentf-workflow:   # This job runs in the build stage, which runs first.
  stage: test
  script:
    - pip install --upgrade opentf-tools
    - |-
      opentf-ctl run workflow .opentf/workflows/my_workflow_2.yaml \
        -f file=my_data/file.xml \
        -e FOO=12
  variables:
    OPENTF_RUN_TARGET: "https://example.com/target"
Applying a Quality Gate to a Completed Workflow
Applying a quality gate to a completed workflow is not a mandatory, but a highly recommended step. Without calling the quality gate, the pipeline will be successful regardless of the test results. When the quality gate is applied to a completed workflow and the workflow does not satisfy the quality gate conditions, the quality gate command will exit with a return code of 102, failing the pipeline.
There are two possibilities to integrate the quality gate in the pipeline: to apply it
directly using the run workflow command (available from the opentf-ctl tool
0.45.0 version) or to retrieve the completed workflow ID first, then to pass it to
the get qualitygate command.
The following pipeline example uses the first option:
# A very simple pipeline with a single "test" stage made of a single workflow "job"

default:
  image: python:3.8

stages:            # List of stages for jobs, and their order of execution
  - test

opentf-workflow:   # This job runs in the build stage, which runs first.
  stage: test
  script:
    - pip install --upgrade opentf-tools
    - |-
      opentf-ctl run workflow .opentf/workflows/workflow.yaml \
        --mode=my.quality.gate
When the workflow workflow.yaml is completed, the quality gate my.quality.gate is
applied to the workflow results.
For the second option, consider the following pipeline example:
# A very simple pipeline with a single "test" stage made of a single workflow "job"

default:
  image: python:3.8

stages:            # List of stages for jobs, and their order of execution
  - test

opentf-workflow:   # This job runs in the build stage, which runs first.
  stage: test
  script:
    - pip install --upgrade opentf-tools
    - RESULT=$(opentf-ctl run workflow .opentf/workflows/workflow.yaml)
    - echo $RESULT
    - WORKFLOW_ID=$(echo $RESULT | awk -F ' ' '{print $2}')
    - opentf-ctl get workflow $WORKFLOW_ID --watch
    - opentf-ctl get qualitygate $WORKFLOW_ID --mode=my.quality.gate
We are storing the ID of the launched workflow (retrieved from the run workflow output)
in the $WORKFLOW_ID variable.
The opentf-ctl get workflow $WORKFLOW_ID --watch command is used to follow the workflow
execution.
The opentf-ctl get qualitygate $WORKFLOW_ID --mode=my.quality.gate command applies the
quality gate my.quality.gate to the workflow results.
See “Running commands (get qualitygate)”
for more information and complete quality gate options list. All these options are
supported in the get qualitygate command as well as in the run workflow command.
Publishing Quality Gate Results as a Merge Request Note
The quality gate results may be published as a merge request note if the pipeline is the merge request pipeline.
In this case, you simply need to add the required parameters to the
opentf-ctl get qualitygate command in your .gitlab-ci.yml file, using --plugin option.
Consider the following pipeline example:
default:
  image: python:3.8

stages:
  - test

opentf-workflow:
  stage: test
  script:
  - pip install --upgrade opentf-tools
  - |-
    opentf-ctl run workflow .opentf/workflows/my_workflow_2.yaml \
      --mode quality.gate \
      --plugin gitlab:keep-history=true \
      --plugin gitlab:token={authentication token}
rules:
  - if: $CI_PIPELINE_SOURCE == 'merge_request_event'
Warning
Note that in the examples in this section, the run workflow command
is used to launch the quality gate after the workflow completion. If your opentf-ctl
tool version is older than 0.45.0, consider updating it. You may also first retrieve
the workflow ID, then pass it to the get qualitygate command, as illustrated in the
previous section.
This pipeline run each time you push a commit to your merge request branch. The
related GitLab instance, project and merge request information will be retrieved
from the GitLab predefined environment variables (CI_SERVER_URL,
CI_MERGE_REQUEST_PROJECT_ID and CI_MERGE_REQUEST_IID). You do not need to
specify them by default.
However, you must define the gitlab:keep-history parameter value. If you set it
to true, all quality gate results will be kept for a given merge request.
When this parameter is set to false, the most recent result for a quality
gate defined by --mode will be updated.
You can pass an authentication token to the gitlab:token parameter if necessary.
You may specify your own GitLab instance, project, merge request and even
issue passing the respective values to the gitlab:server,
gitlab:project, gitlab:mr and/or gitlab:issue parameters. The following
pipeline will publish the quality gate results to the merge request and issue,
project and GitLab instance explicitly defined by the get qualitygate command.
default:
  image: python:3.8

stages:
  - test

opentf-workflow:
  stage: test
  script:
  - pip install --upgrade opentf-tools
  - |-
    opentf-ctl run workflow .opentf/workflows/my_workflow_2.yaml \
      --mode quality.gate \
      --plugin gitlab:keep-history=false \
      --plugin gitlab:server=https://gitlab.example.com \
      --plugin gitlab:project=439048390 \
      --plugin gitlab:mr=4209 \
      --plugin gitlab:issue=888
rules:
  - if: $CI_PIPELINE_SOURCE == 'merge_request_event'
You can also add to the merge request a label containing the quality gate status.
First, you need to create, on the project level, three labels:
{prefix}::Passed, {prefix}::Failed and {prefix}::No test (it is up to you
to choose the prefix). Then pass to the get qualitygate command the --plugin
gitlab:label={prefix} parameter.
More details on the GitLab-related get qualitygate command options are available
under Quality Gate Commands section.
Attaching Surefire Global Report to a Merge Request Pipeline
The Surefire global report generated by the Insight Collector service at the end of each workflow execution can be attached as an artifact to a merge request pipeline. The test execution results and details will then be displayed in the merge request.
Consider the example .gitlab-ci.yml below:
default:
  image: python:3.8
stages:
  - test
opentf-workflow:
  stage: test
  script:
    - pip install --upgrade opentf-tools
    - RESULT=$(opentf-ctl run workflow .opentf/workflows/workflow.yaml -w)
    - WORKFLOW_ID=$(echo $RESULT | awk -F ' ' '{print $2}')
    - opentf-ctl cp $WORKFLOW_ID:* $PWD --type='*executionreport+xml*'
rules:
  - if: $CI_PIPELINE_SOURCE == 'merge_request_event'
artifacts:
  paths:
    - executionreport.xml
  reports:
    junit: executionreport.xml
  expire_in: 1 week
This pipeline executes the workflow and retrieves its ID. Then, the opentf-ctl cp
command is used to copy the execution report xml file to the working directory.
In the artifacts section, attached report path, type, and expiration delay are defined.
Warning
It is assumed, in this example, that the Insight Collector service uses default settings
and produces only one Surefire global report, named executionreport.xml, for each workflow.
If custom Insight Collector settings are used, you may need to modify artifacts section
and/or opentf-ctl cp command (see opentf-ctl cp documentation for command use details).
Next Steps
The opentf-ctl tool you just used offers additional options that can be useful in some contexts.